<?xml version="1.0" encoding="utf-8"?><feed xmlns="http://www.w3.org/2005/Atom" ><generator uri="https://jekyllrb.com/" version="3.10.0">Jekyll</generator><link href="https://twied.github.io/feed.xml" rel="self" type="application/atom+xml" /><link href="https://twied.github.io/" rel="alternate" type="text/html" /><updated>2026-08-05T07:35:39+00:00</updated><id>https://twied.github.io/feed.xml</id><title type="html">Tim Wiederhake</title><subtitle>Short-form thoughts on systems programming, Linux kernel development, and virtualization.</subtitle><author><name>Tim Wiederhake</name></author><entry><title type="html">Custom commands for gitk</title><link href="https://twied.github.io/2026/08/05/gitk-custom-commands.html" rel="alternate" type="text/html" title="Custom commands for gitk" /><published>2026-08-05T00:00:00+00:00</published><updated>2026-08-05T00:00:00+00:00</updated><id>https://twied.github.io/2026/08/05/gitk-custom-commands</id><content type="html" xml:base="https://twied.github.io/2026/08/05/gitk-custom-commands.html"><![CDATA[<p>I love extensible tools. Things that are simple and easy to learn, and yet 
support power user usage patterns. One thing that I particularly like when 
tools do it, is when they have a mechanism to define “user actions” or “user 
commands” so I can bolt on whatever script I want or need to create support for 
a use case that the developer never could have anticipated.</p>

<p>I love <a href="https://git-scm.com/docs/gitk">gitk</a>. It ships with git itself, which 
means every git installation has it, and it is still the fastest (gui) way I 
know to browse a repository’s history. Oftentimes I find myself doing code 
review for myself in gitk, just clicking through the commits and reading the 
diff. And every time I find something I want to change, I have to switch to a 
terminal, run <code class="language-plaintext highlighter-rouge">git rebase -i &lt;basecommit&gt;</code>, search for the right commit in the 
editor, change the entry from “pick” to “edit”, then open an editor for the 
file in question, find the correct spot, make the change, close the editor, 
<code class="language-plaintext highlighter-rouge">git add</code> my changes, and run <code class="language-plaintext highlighter-rouge">git rebase --continue</code>.</p>

<p>My choices are now basically to switch to a different tool that supports that
kind of workflow, or I teach gitk how to run scripts. I chose the latter.</p>

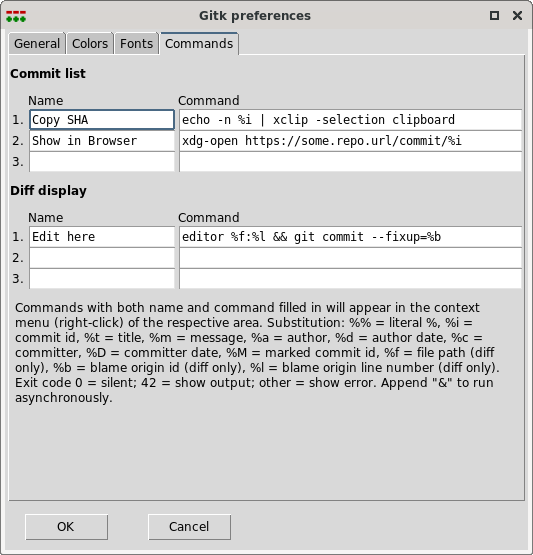
<p>With my patch applied, you can define up to three commands each for the commit 
list and the diff display area. Commands are configured in a new “Commands” tab 
in the preferences dialog:</p>

<p><img src="/assets/images/gitk-preferences.png" alt="The new Commands tab in gitk's 
preferences" /></p>

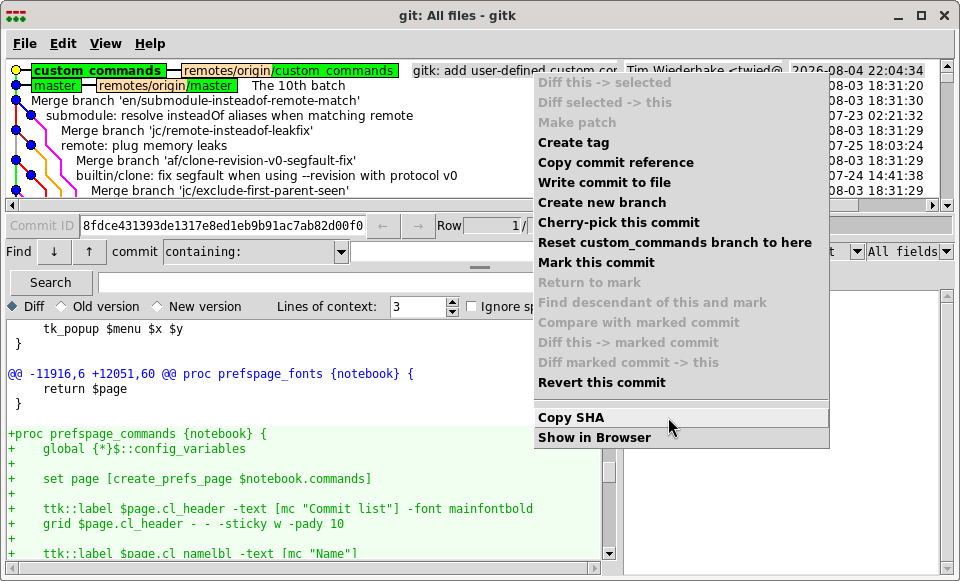
<p>Each command has a name and a command template. Non-empty slots show up in the
right-click context menu of the respective area:</p>

<p><img src="/assets/images/gitk-commitlist.png" alt="Custom commands in the commit list context 
menu" /></p>

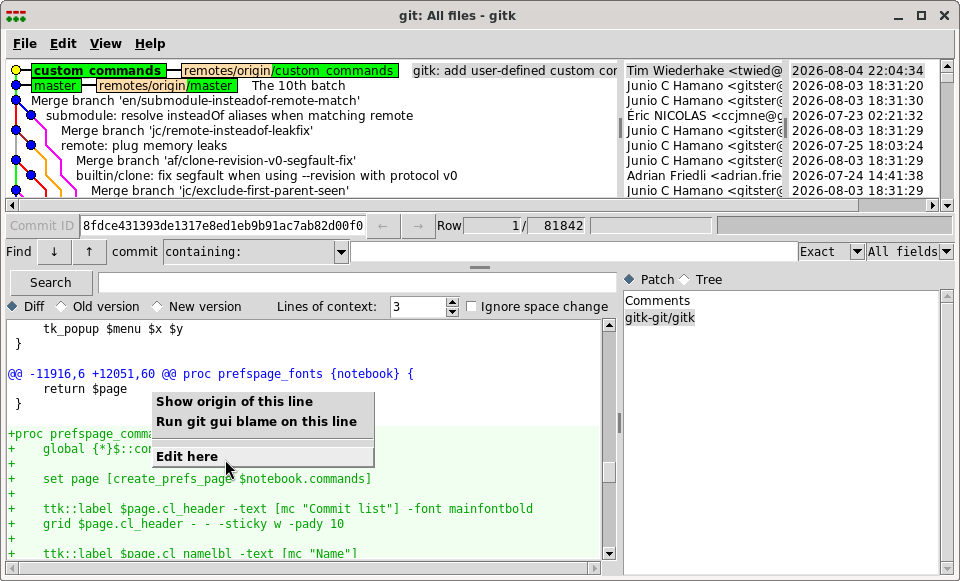
<p><img src="/assets/images/gitk-diffcontext.png" alt="Custom commands in the diff view context 
menu" /></p>

<p>Command templates support placeholder substitution and are executed via
<code class="language-plaintext highlighter-rouge">sh -c</code>. The available placeholders are:</p>

<table>
  <thead>
    <tr>
      <th>Placeholder</th>
      <th>Substitution</th>
    </tr>
  </thead>
  <tbody>
    <tr>
      <td><code class="language-plaintext highlighter-rouge">%i</code></td>
      <td>Commit id</td>
    </tr>
    <tr>
      <td><code class="language-plaintext highlighter-rouge">%t</code></td>
      <td>Commit title</td>
    </tr>
    <tr>
      <td><code class="language-plaintext highlighter-rouge">%m</code></td>
      <td>Commit message</td>
    </tr>
    <tr>
      <td><code class="language-plaintext highlighter-rouge">%a</code></td>
      <td>Author</td>
    </tr>
    <tr>
      <td><code class="language-plaintext highlighter-rouge">%d</code></td>
      <td>Author date</td>
    </tr>
    <tr>
      <td><code class="language-plaintext highlighter-rouge">%c</code></td>
      <td>Committer</td>
    </tr>
    <tr>
      <td><code class="language-plaintext highlighter-rouge">%D</code></td>
      <td>Committer date</td>
    </tr>
    <tr>
      <td><code class="language-plaintext highlighter-rouge">%M</code></td>
      <td>Marked commit id</td>
    </tr>
    <tr>
      <td><code class="language-plaintext highlighter-rouge">%f</code></td>
      <td>File path (diff view only)</td>
    </tr>
    <tr>
      <td><code class="language-plaintext highlighter-rouge">%b</code></td>
      <td>Blame origin commit id (diff view only)</td>
    </tr>
    <tr>
      <td><code class="language-plaintext highlighter-rouge">%l</code></td>
      <td>Blame origin line number (diff view only)</td>
    </tr>
    <tr>
      <td><code class="language-plaintext highlighter-rouge">%%</code></td>
      <td>Literal <code class="language-plaintext highlighter-rouge">%</code></td>
    </tr>
  </tbody>
</table>

<p>Exit code 0 means silent success. Exit code 42 displays the command’s output
in a message box. Any other exit code displays an error. Append <code class="language-plaintext highlighter-rouge">&amp;</code> to run the
command asynchronously.</p>

<p>Find the pull request <a href="https://github.com/git/git/pull/2371">here</a>.</p>]]></content><author><name>Tim Wiederhake</name></author><category term="git" /><category term="tools" /><summary type="html"><![CDATA[I love extensible tools. Things that are simple and easy to learn, and yet support power user usage patterns. One thing that I particularly like when tools do it, is when they have a mechanism to define “user actions” or “user commands” so I can bolt on whatever script I want or need to create support for a use case that the developer never could have anticipated. I love gitk. It ships with git itself, which means every git installation has it, and it is still the fastest (gui) way I know to browse a repository’s history. Oftentimes I find myself doing code review for myself in gitk, just clicking through the commits and reading the diff. And every time I find something I want to change, I have to switch to a terminal, run git rebase -i &lt;basecommit&gt;, search for the right commit in the editor, change the entry from “pick” to “edit”, then open an editor for the file in question, find the correct spot, make the change, close the editor, git add my changes, and run git rebase --continue. My choices are now basically to switch to a different tool that supports that kind of workflow, or I teach gitk how to run scripts. I chose the latter. With my patch applied, you can define up to three commands each for the commit list and the diff display area. Commands are configured in a new “Commands” tab in the preferences dialog: Each command has a name and a command template. Non-empty slots show up in the right-click context menu of the respective area: Command templates support placeholder substitution and are executed via sh -c. The available placeholders are: Placeholder Substitution %i Commit id %t Commit title %m Commit message %a Author %d Author date %c Committer %D Committer date %M Marked commit id %f File path (diff view only) %b Blame origin commit id (diff view only) %l Blame origin line number (diff view only) %% Literal % Exit code 0 means silent success. Exit code 42 displays the command’s output in a message box. Any other exit code displays an error. Append &amp; to run the command asynchronously. Find the pull request here.]]></summary></entry><entry><title type="html">Make Kitty look like Xfce Terminal</title><link href="https://twied.github.io/2026/07/28/xfce-terminal-kitty.html" rel="alternate" type="text/html" title="Make Kitty look like Xfce Terminal" /><published>2026-07-28T00:00:00+00:00</published><updated>2026-07-28T00:00:00+00:00</updated><id>https://twied.github.io/2026/07/28/xfce-terminal-kitty</id><content type="html" xml:base="https://twied.github.io/2026/07/28/xfce-terminal-kitty.html"><![CDATA[<p>I love <a href="https://xfce.org/">Xfce</a>. In fact, Xfce is the reason I am still using
X11, despite being <a href="https://www.phoronix.com/news/MTA4OTM">one of Wayland’s earliest contributors</a>.
But two weeks ago I made the switch from Xfce4-Terminal to
<a href="https://sw.kovidgoyal.net/kitty/">Kitty</a>.</p>

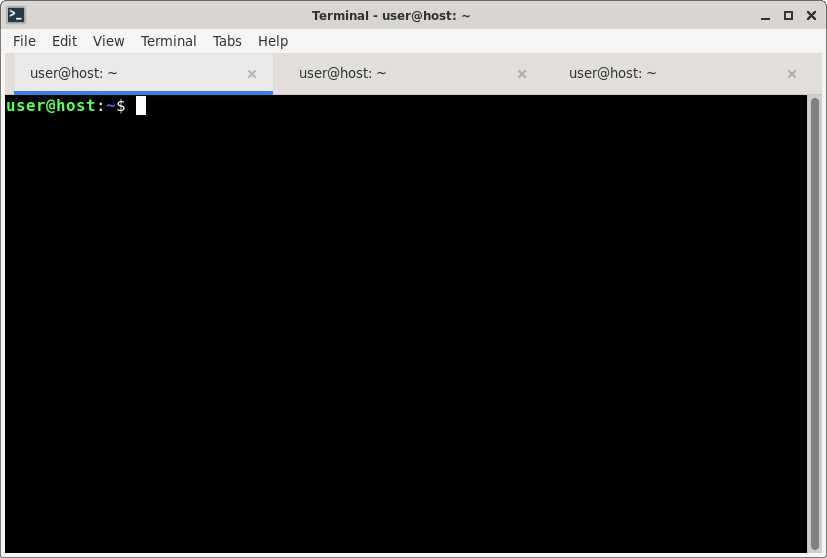
<p><img src="/assets/images/kitty-xfce.png" alt="Xfce4-Terminal" /></p>

<p>Kitty is… “opinionated” in certain regards, but surprisingly standards 
conformant. The “kitten” program that bundles all the “built-in” functionality 
of this terminal emulator allows for amazing customizability. And yet, if 
you just start kitty, it looks, well, a bit rough to someone with two decades 
of Xfce4-Terminal socialization:</p>

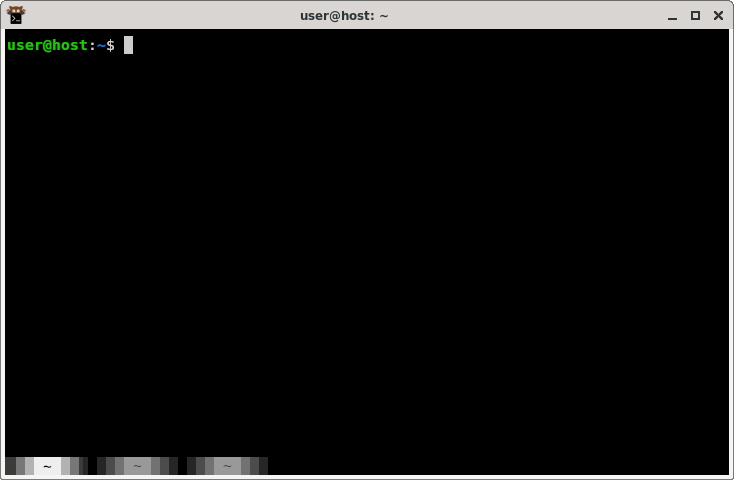
<p><img src="/assets/images/kitty-before.png" alt="Kitty with default config" /></p>

<p>In this article I will list the configuration settings that I use to make kitty 
more familiar and maybe one or two other Xfce expats might find them useful, 
too.</p>

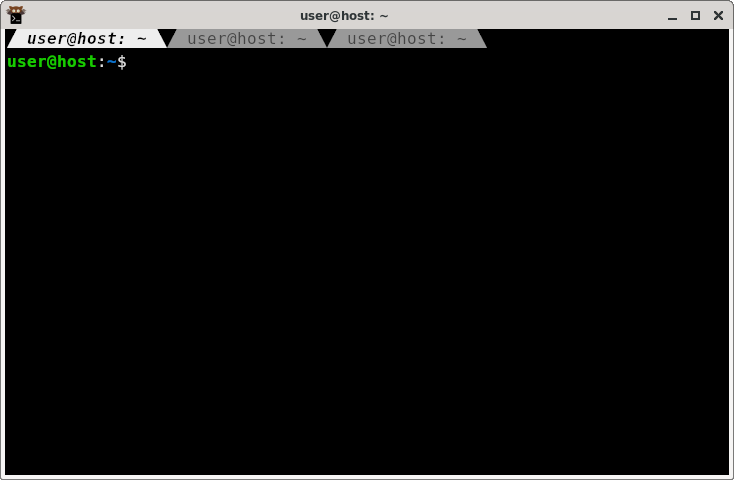
<p><img src="/assets/images/kitty-after.png" alt="Kitty with my config" /></p>

<h2 id="generating-a-new-config">Generating a new config</h2>

<p>Kitty stores its config file at <code class="language-plaintext highlighter-rouge">~/.config/kitty/kitty.conf</code>. This file does 
not exist by default. If you start kitty and press <code class="language-plaintext highlighter-rouge">Ctrl+Shift+F2</code>, an 
extensively annotated default config file will be generated and opened in your 
favorite text editor. Use that as your base.</p>

<h2 id="font-size">Font size</h2>

<p>Kitty defaults to 11pt. Maybe it’s just me and age taking a toll on my eyes,
but I need at least 12pt to read comfortably:</p>

<div class="language-plaintext highlighter-rouge"><div class="highlight"><pre class="highlight"><code>font_size 12.0
</code></pre></div></div>

<h2 id="tab-bar">Tab bar</h2>

<p>I want my tab bar at the top, and looking more like actual tabs:</p>

<div class="language-plaintext highlighter-rouge"><div class="highlight"><pre class="highlight"><code>tab_bar_edge top
tab_bar_style slant
</code></pre></div></div>

<p>I also have taken a liking to having the tab bar always visible, even if there
is only one tab:</p>

<div class="language-plaintext highlighter-rouge"><div class="highlight"><pre class="highlight"><code>tab_bar_min_tabs 1
</code></pre></div></div>

<p>And while we are at it, don’t overwrite the tab title by default:</p>

<div class="language-plaintext highlighter-rouge"><div class="highlight"><pre class="highlight"><code>shell_integration no-title
</code></pre></div></div>

<h2 id="new-tabs-in-current-directory">New tabs in current directory</h2>

<div class="language-plaintext highlighter-rouge"><div class="highlight"><pre class="highlight"><code>map kitty_mod+enter launch --cwd=current --location=vsplit
map kitty_mod+t new_tab_with_cwd
</code></pre></div></div>

<h2 id="scroll-bar">Scroll bar</h2>

<p>I want the scroll bar to be always visible, not only on mouse-over or 
scrolling, and I like it a little bit wider, say a full display cell instead of 
the default half:</p>

<div class="language-plaintext highlighter-rouge"><div class="highlight"><pre class="highlight"><code>scrollbar always
scrollbar_width 1
</code></pre></div></div>

<h2 id="next-and-previous-tabs">Next and previous tabs</h2>

<p>Kitty defaults to <code class="language-plaintext highlighter-rouge">Ctrl+Tab</code> and <code class="language-plaintext highlighter-rouge">Ctrl+Shift+Tab</code> for cycling through tabs. I 
have built a lot of muscle-memory for <code class="language-plaintext highlighter-rouge">Ctrl+PgUp</code> and <code class="language-plaintext highlighter-rouge">Ctrl+PgDn</code> over the 
years, so let’s add these bindings:</p>

<div class="language-plaintext highlighter-rouge"><div class="highlight"><pre class="highlight"><code>map ctrl+page_down next_tab
map ctrl+page_up previous_tab
</code></pre></div></div>

<h2 id="sound">Sound</h2>

<p>Pet peeve. I don’t want any “bing”, “boing”, “wush”, “shwich” or “dong” in my
terminal. Draw a little bell emoji in the tab title if you need my attention:</p>

<div class="language-plaintext highlighter-rouge"><div class="highlight"><pre class="highlight"><code>bell_on_tab "🔔 "
enable_audio_bell no
</code></pre></div></div>

<h2 id="bonus--friendly-window-switching">Bonus: 🇩🇪-friendly window switching</h2>

<p>Kitty comes with built-in window support, effectively <code class="language-plaintext highlighter-rouge">tmux</code> but with support from 
the terminal emulator, and it’s awesome. Only fly in the ointment: Cycling 
between the windows is mapped to <code class="language-plaintext highlighter-rouge">Ctrl+[</code> and <code class="language-plaintext highlighter-rouge">Ctrl+]</code>, which on a German 
keyboard are mapped behind <code class="language-plaintext highlighter-rouge">AltGr+8</code> and <code class="language-plaintext highlighter-rouge">AltGr+9</code>, making the combo awkward.
I have remapped this to <code class="language-plaintext highlighter-rouge">Alt+Left</code> and <code class="language-plaintext highlighter-rouge">Alt+Right</code>:</p>

<div class="language-plaintext highlighter-rouge"><div class="highlight"><pre class="highlight"><code>map alt+left previous_window
map alt+right next_window
</code></pre></div></div>]]></content><author><name>Tim Wiederhake</name></author><category term="terminal" /><category term="tools" /><summary type="html"><![CDATA[I love Xfce. In fact, Xfce is the reason I am still using X11, despite being one of Wayland’s earliest contributors. But two weeks ago I made the switch from Xfce4-Terminal to Kitty. Kitty is… “opinionated” in certain regards, but surprisingly standards conformant. The “kitten” program that bundles all the “built-in” functionality of this terminal emulator allows for amazing customizability. And yet, if you just start kitty, it looks, well, a bit rough to someone with two decades of Xfce4-Terminal socialization: In this article I will list the configuration settings that I use to make kitty more familiar and maybe one or two other Xfce expats might find them useful, too. Generating a new config Kitty stores its config file at ~/.config/kitty/kitty.conf. This file does not exist by default. If you start kitty and press Ctrl+Shift+F2, an extensively annotated default config file will be generated and opened in your favorite text editor. Use that as your base. Font size Kitty defaults to 11pt. Maybe it’s just me and age taking a toll on my eyes, but I need at least 12pt to read comfortably: font_size 12.0 Tab bar I want my tab bar at the top, and looking more like actual tabs: tab_bar_edge top tab_bar_style slant I also have taken a liking to having the tab bar always visible, even if there is only one tab: tab_bar_min_tabs 1 And while we are at it, don’t overwrite the tab title by default: shell_integration no-title New tabs in current directory map kitty_mod+enter launch --cwd=current --location=vsplit map kitty_mod+t new_tab_with_cwd Scroll bar I want the scroll bar to be always visible, not only on mouse-over or scrolling, and I like it a little bit wider, say a full display cell instead of the default half: scrollbar always scrollbar_width 1 Next and previous tabs Kitty defaults to Ctrl+Tab and Ctrl+Shift+Tab for cycling through tabs. I have built a lot of muscle-memory for Ctrl+PgUp and Ctrl+PgDn over the years, so let’s add these bindings: map ctrl+page_down next_tab map ctrl+page_up previous_tab Sound Pet peeve. I don’t want any “bing”, “boing”, “wush”, “shwich” or “dong” in my terminal. Draw a little bell emoji in the tab title if you need my attention: bell_on_tab "🔔 " enable_audio_bell no Bonus: 🇩🇪-friendly window switching Kitty comes with built-in window support, effectively tmux but with support from the terminal emulator, and it’s awesome. Only fly in the ointment: Cycling between the windows is mapped to Ctrl+[ and Ctrl+], which on a German keyboard are mapped behind AltGr+8 and AltGr+9, making the combo awkward. I have remapped this to Alt+Left and Alt+Right: map alt+left previous_window map alt+right next_window]]></summary></entry><entry><title type="html">The std::map antipattern</title><link href="https://twied.github.io/2026/07/15/cpp-map-antipattern.html" rel="alternate" type="text/html" title="The std::map antipattern" /><published>2026-07-15T00:00:00+00:00</published><updated>2026-07-15T00:00:00+00:00</updated><id>https://twied.github.io/2026/07/15/cpp-map-antipattern</id><content type="html" xml:base="https://twied.github.io/2026/07/15/cpp-map-antipattern.html"><![CDATA[<p>Here is a pattern I see every now and then in C++ codebases, and have even 
written myself:</p>

<div class="language-cpp highlighter-rouge"><div class="highlight"><pre class="highlight"><code><span class="k">struct</span> <span class="nc">Employee</span> <span class="p">{</span>
    <span class="kt">int</span> <span class="n">id</span><span class="p">;</span>
    <span class="n">std</span><span class="o">::</span><span class="n">string</span> <span class="n">name</span><span class="p">;</span>
    <span class="p">...</span>
<span class="p">};</span>

<span class="n">std</span><span class="o">::</span><span class="n">map</span><span class="o">&lt;</span><span class="kt">int</span><span class="p">,</span> <span class="n">Employee</span><span class="o">&gt;</span> <span class="n">employees</span><span class="p">;</span>
</code></pre></div></div>

<p>The key is the employee’s id. The value is the employee, which also contains
the id. The id is stored twice: once as the map key, once inside the
struct. Every insertion duplicates it, every lookup compares against the copy
in the key, and the copy inside the value just sits there, taking up memory
and begging to go out of sync.</p>

<p>This is one of those little code smells that irk me and taunt me, but this time
I actually have a solution. C++14 came in to the rescue.</p>

<div class="language-cpp highlighter-rouge"><div class="highlight"><pre class="highlight"><code><span class="k">struct</span> <span class="nc">Employee</span> <span class="p">{</span>
    <span class="kt">int</span> <span class="n">id</span><span class="p">;</span>
    <span class="n">std</span><span class="o">::</span><span class="n">string</span> <span class="n">name</span><span class="p">;</span>
    <span class="p">...</span>
<span class="p">};</span>

<span class="kt">bool</span> <span class="k">operator</span><span class="o">&lt;</span><span class="p">(</span><span class="k">const</span> <span class="n">Employee</span><span class="o">&amp;</span> <span class="n">lhs</span><span class="p">,</span> <span class="k">const</span> <span class="n">Employee</span><span class="o">&amp;</span> <span class="n">rhs</span><span class="p">)</span> <span class="p">{</span>
    <span class="k">return</span> <span class="n">lhs</span><span class="p">.</span><span class="n">id</span> <span class="o">&lt;</span> <span class="n">rhs</span><span class="p">.</span><span class="n">id</span><span class="p">;</span>
<span class="p">}</span>

<span class="kt">bool</span> <span class="k">operator</span><span class="o">&lt;</span><span class="p">(</span><span class="k">const</span> <span class="n">Employee</span><span class="o">&amp;</span> <span class="n">lhs</span><span class="p">,</span> <span class="k">const</span> <span class="kt">int</span><span class="o">&amp;</span> <span class="n">rhs</span><span class="p">)</span> <span class="p">{</span>
    <span class="k">return</span> <span class="n">lhs</span><span class="p">.</span><span class="n">id</span> <span class="o">&lt;</span> <span class="n">rhs</span><span class="p">;</span>
<span class="p">}</span>

<span class="kt">bool</span> <span class="k">operator</span><span class="o">&lt;</span><span class="p">(</span><span class="k">const</span> <span class="kt">int</span><span class="o">&amp;</span> <span class="n">lhs</span><span class="p">,</span> <span class="k">const</span> <span class="n">Employee</span><span class="o">&amp;</span> <span class="n">rhs</span><span class="p">)</span> <span class="p">{</span>
    <span class="k">return</span> <span class="n">lhs</span> <span class="o">&lt;</span> <span class="n">rhs</span><span class="p">.</span><span class="n">id</span><span class="p">;</span>
<span class="p">}</span>


<span class="n">std</span><span class="o">::</span><span class="n">set</span><span class="o">&lt;</span><span class="n">Employee</span><span class="p">,</span> <span class="n">std</span><span class="o">::</span><span class="n">less</span><span class="o">&lt;&gt;&gt;</span> <span class="n">employees</span><span class="p">;</span>
</code></pre></div></div>

<p>Make the container a <code class="language-plaintext highlighter-rouge">std::set</code> instead of a <code class="language-plaintext highlighter-rouge">std::map</code>. Using <code class="language-plaintext highlighter-rouge">std::less&lt;&gt;</code> 
enables heterogeneous lookup. No need to construct a full object, 
<code class="language-plaintext highlighter-rouge">std::set::find()</code> can then accept an argument of the key type.</p>

<div class="language-plaintext highlighter-rouge"><div class="highlight"><pre class="highlight"><code>int main() {
    employees.insert({1, "Neo" });
    employees.insert({2, "Trinity" });
    employees.insert({3, "Morpheus" });

    if (auto search = employees.find(1); search != employees.end())
        std::cout &lt;&lt; "Found " &lt;&lt; search-&gt;name &lt;&lt; '\n';
    else
        std::cout &lt;&lt; "Not found\n";

    return 0;
}
</code></pre></div></div>]]></content><author><name>Tim Wiederhake</name></author><category term="cpp" /><summary type="html"><![CDATA[Here is an antipattern I see every now and then in C++ codebases, and have even written myself: ```cpp std::map ``` where the map of the key is repeated in the value struct, just sitting there, taking up memory and begging to go out of sync. The solution is a feature introduced in C++14, that allows heterogeneous lookup for `std::set`...]]></summary></entry><entry><title type="html">TIL: git absorb</title><link href="https://twied.github.io/2026/07/05/git-absorb.html" rel="alternate" type="text/html" title="TIL: git absorb" /><published>2026-07-05T00:00:00+00:00</published><updated>2026-07-05T00:00:00+00:00</updated><id>https://twied.github.io/2026/07/05/git-absorb</id><content type="html" xml:base="https://twied.github.io/2026/07/05/git-absorb.html"><![CDATA[<p><code class="language-plaintext highlighter-rouge">git absorb</code> looks at your unstaged changes, figures out which commits on your 
feature branch they belong to, and creates the right <code class="language-plaintext highlighter-rouge">--fixup</code> commits 
automatically. Follow up with <code class="language-plaintext highlighter-rouge">git rebase --autosquash</code> to fold them in, or use 
the <code class="language-plaintext highlighter-rouge">-r</code> or <code class="language-plaintext highlighter-rouge">--and-rebase</code> argument to <code class="language-plaintext highlighter-rouge">git absorb</code> to run the rebase 
automatically.</p>

<p>It replaces the manual workflow of staring at a diff, deciding “this hunk goes 
with commit 3, that one with commit 7,” and running <code class="language-plaintext highlighter-rouge">git commit --fixup</code> for 
each one. I have been doing that manually for years. And I really don’t want to 
talk about how often fixes have ended up in the wrong commit anyway, regardless 
of how careful I have been.</p>

<p>Curious what else I’ve been missing.</p>

<p>Man page for git absorb: 
<a href="https://man.archlinux.org/man/git-absorb.1.en">git-absorb</a></p>

<p>Install with <code class="language-plaintext highlighter-rouge">cargo install git-absorb</code> or through your distribution’s package 
manager (Fedora: <code class="language-plaintext highlighter-rouge">dnf install git-absorb</code>, Debian: <code class="language-plaintext highlighter-rouge">apt install git-absorb</code>).</p>]]></content><author><name>Tim Wiederhake</name></author><category term="git" /><category term="tools" /><category term="TIL" /><summary type="html"><![CDATA[git absorb looks at your unstaged changes, figures out which commits on your feature branch they belong to, and creates the right --fixup commits automatically. Follow up with git rebase --autosquash to fold them in, or use the -r or --and-rebase argument to git absorb to run the rebase automatically. It replaces the manual workflow of staring at a diff, deciding “this hunk goes with commit 3, that one with commit 7,” and running git commit --fixup for each one. I have been doing that manually for years. And I really don’t want to talk about how often fixes have ended up in the wrong commit anyway, regardless of how careful I have been. Curious what else I’ve been missing. Man page for git absorb: git-absorb Install with cargo install git-absorb or through your distribution’s package manager (Fedora: dnf install git-absorb, Debian: apt install git-absorb).]]></summary></entry><entry><title type="html">The msr files are weird</title><link href="https://twied.github.io/2026/06/26/linux-msr-patches.html" rel="alternate" type="text/html" title="The msr files are weird" /><published>2026-06-26T00:00:00+00:00</published><updated>2026-07-21T00:00:00+00:00</updated><id>https://twied.github.io/2026/06/26/linux-msr-patches</id><content type="html" xml:base="https://twied.github.io/2026/06/26/linux-msr-patches.html"><![CDATA[<p>Have you ever read from or written to the <code class="language-plaintext highlighter-rouge">/dev/cpu/*/msr</code> files? If you aren’t
in virtualization, RAPL monitoring tools, or performance analysis tools,
chances are low. But if you have, you might have stumbled across some very
weird behavior:
<!--more--></p>

<ul>
  <li>
    <p>Reading into a buffer that is bigger than 8 bytes (the size of one MSR
register), does not read consecutive registers, but the same register over
and over.</p>
  </li>
  <li>
    <p>Writing from a buffer that is bigger than 8 bytes does not write consecutive
registers, but the same register over and over.</p>
  </li>
  <li>
    <p>Access to these files is locked behind file mode 0600 <em>and</em> <code class="language-plaintext highlighter-rouge">CAP_SYS_RAWIO</code>.</p>
  </li>
</ul>

<p>My attempt to let ordinary users read at least <em>some</em> MSR registers in 2023
<a href="https://lore.kernel.org/kvm/20230530102358.16430-1-twiederh@redhat.com/">failed</a>,
but I want to try again and make at least the reading and writing behavior less
surprising. Patch is <a href="https://lore.kernel.org/lkml/20260626174037.1128563-1-twiederh@redhat.com/">here</a>.</p>

<p><strong>Update, 2026-06-26:</strong></p>

<p><a href="https://lore.kernel.org/lkml/33F430D0-EFE6-471F-B4A1-D5D20E1F65AD@zytor.com/">Review</a> 
is in. Need to drop the restriction to single writes. I can see the argument, 
but I don’t know if the overhead of multiple <code class="language-plaintext highlighter-rouge">pwrite</code> calls would really be so 
noticeable.</p>

<p><strong>Update, 2026-06-26, but later:</strong></p>

<p><a href="https://lore.kernel.org/lkml/0239cda7-b638-44df-9739-746a7173a577@zytor.com/">Review for v2</a> 
is here as well, and there goes the restriction to the read function. 
Unsatisfactory. I hope at least the changes to the file comment go through so
that the next developer who stumbles across this knows that there are users for
this behavior.</p>

<p><strong>Update, 2026-07-21:</strong></p>

<p><a href="https://git.kernel.org/pub/scm/linux/kernel/git/tip/tip.git/commit/?id=b096d79bc1eed9eda57c12ccd76d6797cdba4cf2">They did!</a></p>]]></content><author><name>Tim Wiederhake</name></author><category term="linux" /><category term="kernel" /><summary type="html"><![CDATA[Have you ever read from or written to the /dev/cpu/*/msr files? If you aren’t in virtualization, RAPL monitoring tools, or performance analysis tools, chances are low. But if you have, you might have stumbled across some very weird behavior:]]></summary></entry><entry><title type="html">Dipping my toes into FPGA development</title><link href="https://twied.github.io/2026/02/20/fpga.html" rel="alternate" type="text/html" title="Dipping my toes into FPGA development" /><published>2026-02-20T00:00:00+00:00</published><updated>2026-02-20T00:00:00+00:00</updated><id>https://twied.github.io/2026/02/20/fpga</id><content type="html" xml:base="https://twied.github.io/2026/02/20/fpga.html"><![CDATA[<p>I recently came across the “Sipeed Tang Primer 20k”, an entry-level FPGA. The 
internet claims that it can be programmed and used with an all-open-source tool 
chain.</p>

<p>During my studies, I dabbled a bit with FPGAs, nothing serious, but enough to 
make me curious. I recall the problems with the decidedly not open-source 
software required to program the boards, and the significant price of the 
boards. And here I was looking at an offer of less than 50 Euro for the board, 
with shipping and a few peripherals to toy around with still below a hundred.</p>

<p>Long story short, I am now the proud owner of such a device. But I have to say 
that “open source toolchain is supported” is technically true, but leaves out 
quite a bit about user friendliness, or the lack thereof. The tools are in the 
Debian repositories (or at least mostly are) but fail silently. Only the newest 
versions work correctly and you have to compile the toolchain from source to 
get everything working. For easy installation, I have assembled a <a href="https://github.com/twied/TangPrimer-20K-example/tree/master/docker">Docker 
container</a> 
that includes the necessary software and wrapper scripts for ease-of-use.</p>

<p>The official examples and demo projects for the Tang Primer 20k live 
<a href="https://github.com/sipeed/TangPrimer-20K-example/">here</a>, but for a beginner 
like me, these are not well suited. If you are looking for examples that get 
you started and are maybe a bit more basic, look here: 
<a href="https://github.com/twied/TangPrimer-20K-example">https://github.com/twied/TangPrimer-20K-example</a></p>

<p>Examples in this repository:</p>

<ul>
  <li>
    <p><strong>LEDs</strong>: The ext board comes with six orange LEDS located at the right side 
of the board. They are labeled “5” to “0” from top to bottom. The example 
displays a simple static pattern.</p>
  </li>
  <li>
    <p><strong>Clock</strong>: A simple example that flashes the LEDs once per second, in an
alternating pattern.</p>
  </li>
  <li>
    <p><strong>Switches</strong>: This example demonstrates how to read the status of the 5
switches located at the right side of the board. The LEDs display the result 
of some boolean functions.</p>
  </li>
  <li>
    <p><strong>Buttons</strong>: This example shows how to read the status of the 5 buttons
located at the left side of the board. Pushing S0 will turn LED 0 on, pushing 
S1 will turn the LED off.</p>
  </li>
  <li>
    <p><strong>RGB LED</strong>: This example shows how to drive the RGB LED on the top left of
the board by turning it yellow at medium intensity.</p>
  </li>
  <li>
    <p><strong>Sound</strong>: This example shows how to use the audio jack on the top right of
the board by playing a short sound file in a loop.</p>
  </li>
</ul>]]></content><author><name>Tim Wiederhake</name></author><category term="hardware" /><category term="fpga" /><summary type="html"><![CDATA[I recently came across the “Sipeed Tang Primer 20k”, an entry-level FPGA. The internet claims that it can be programmed and used with an all-open-source tool chain. During my studies, I dabbled a bit with FPGAs, nothing serious, but enough to make me curious. I recall the problems with the decidedly not open-source software required to program the boards, and the significant price of the boards. And here I was looking at an offer of less than 50 Euro for the board, with shipping and a few peripherals to toy around with still below a hundred. Long story short, I am now the proud owner of such a device. But I have to say that “open source toolchain is supported” is technically true, but leaves out quite a bit about user friendliness, or the lack thereof. The tools are in the Debian repositories (or at least mostly are) but fail silently. Only the newest versions work correctly and you have to compile the toolchain from source to get everything working. For easy installation, I have assembled a Docker container that includes the necessary software and wrapper scripts for ease-of-use. The official examples and demo projects for the Tang Primer 20k live here, but for a beginner like me, these are not well suited. If you are looking for examples that get you started and are maybe a bit more basic, look here: https://github.com/twied/TangPrimer-20K-example Examples in this repository: LEDs: The ext board comes with six orange LEDS located at the right side of the board. They are labeled “5” to “0” from top to bottom. The example displays a simple static pattern. Clock: A simple example that flashes the LEDs once per second, in an alternating pattern. Switches: This example demonstrates how to read the status of the 5 switches located at the right side of the board. The LEDs display the result of some boolean functions. Buttons: This example shows how to read the status of the 5 buttons located at the left side of the board. Pushing S0 will turn LED 0 on, pushing S1 will turn the LED off. RGB LED: This example shows how to drive the RGB LED on the top left of the board by turning it yellow at medium intensity. Sound: This example shows how to use the audio jack on the top right of the board by playing a short sound file in a loop.]]></summary></entry><entry><title type="html">Podman: two minutes to sub-second</title><link href="https://twied.github.io/2025/09/19/podman-overlayfs.html" rel="alternate" type="text/html" title="Podman: two minutes to sub-second" /><published>2025-09-19T00:00:00+00:00</published><updated>2025-09-19T00:00:00+00:00</updated><id>https://twied.github.io/2025/09/19/podman-overlayfs</id><content type="html" xml:base="https://twied.github.io/2025/09/19/podman-overlayfs.html"><![CDATA[<p>If your Podman containers take over two minutes to start, check your storage
driver:</p>

<div class="language-plaintext highlighter-rouge"><div class="highlight"><pre class="highlight"><code>$ podman info --debug | grep graphDriverName
graphDriverName: vfs
</code></pre></div></div>

<p>If it says <code class="language-plaintext highlighter-rouge">vfs</code>, that is your problem. The <code class="language-plaintext highlighter-rouge">vfs</code> storage driver copies the 
entire container image on every start. No copy-on-write, no layer sharing, just 
a full deep copy. This apparently is the default you get, when installing 
podman on Debian with “recommended packages” disabled.</p>

<p>Install <code class="language-plaintext highlighter-rouge">fuse-overlayfs</code>, and run:</p>

<div class="language-plaintext highlighter-rouge"><div class="highlight"><pre class="highlight"><code># WARNING! This deletes all containers, all images, all storage, everything!
$ podman system reset
</code></pre></div></div>

<p>Now the output changes to:</p>

<div class="language-plaintext highlighter-rouge"><div class="highlight"><pre class="highlight"><code>$ podman info --debug | grep graphDriverName
graphDriverName: overlay
</code></pre></div></div>

<p>Container startup went from 130 to 0.7 seconds, more than two orders of 
magnitude improvement.</p>]]></content><author><name>Tim Wiederhake</name></author><category term="linux" /><category term="containers" /><summary type="html"><![CDATA[If your Podman containers take over two minutes to start, check your storage driver: $ podman info --debug | grep graphDriverName graphDriverName: vfs If it says vfs, that is your problem. The vfs storage driver copies the entire container image on every start. No copy-on-write, no layer sharing, just a full deep copy. This apparently is the default you get, when installing podman on Debian with “recommended packages” disabled. Install fuse-overlayfs, and run: # WARNING! This deletes all containers, all images, all storage, everything! $ podman system reset Now the output changes to: $ podman info --debug | grep graphDriverName graphDriverName: overlay Container startup went from 130 to 0.7 seconds, more than two orders of magnitude improvement.]]></summary></entry></feed>